For backup client computer on Windows, double-click on the OBM desktop icon or right-click on the system tray icon:
For backup client computer on Linux, enter the following command to start the OBM graphical user interface:
# sh /usr/local/obm/bin/RunOBC.sh &
For initial login, the trial registration dialog will be displayed.

Menu Item |
Description |
Language |
Drop down menu for selecting language to start the backup application. |
Backup Server |
Input box for entering hostname or IP address of the backup server. |
http / https |
Drop down menu for selecting http or https protocol when connecting to the backup server. |
Proxy Setting |
Incremental |
Login Name |
Input box for entering trial backup user login name. |
Password |
Input box for entering trial backup user password. |
Contact |
Input box for entering trail backup user email contact. |
Submit |
Input box for entering trail backup user email contact. |
Already a user? |
Click to access the login dialog, for user with backup user account already. |
* The availability of features listed above may be service provider dependent. If a feature is not available, please check with your service provider for further details and availability. For sub-sequence login, the login dialog will be displayed.
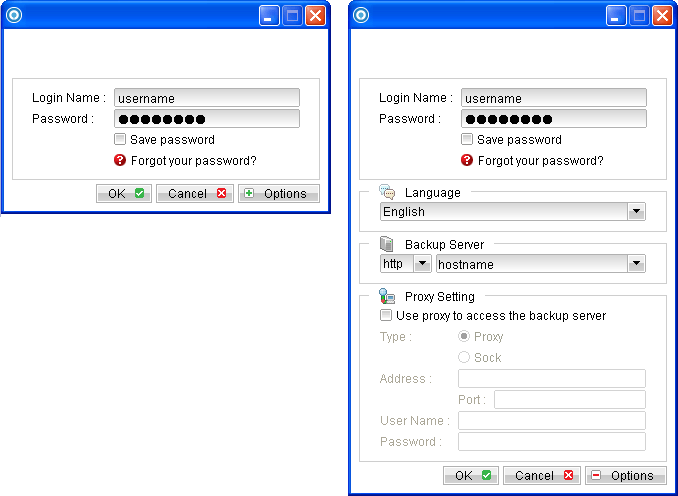
Menu Item |
Description |
Login Name |
Input box for entering backup user account login name. |
Password |
Input box for entering backup user account password. |
Save Password |
Checkbox to enable or disable password saving. |
Forgot your password? |
Click to request for lost password. |
Options |
Click to access advance option such as [Language], [Backup Server] and [Proxy Setting]. |
Language |
Drop down menu for selecting language to start the backup application. |
Backup Server |
Input box for entering hostname or IP address of the backup server. |
http / https |
Drop down menu for selecting protocol when connecting to the backup server. |
Proxy Setting |
Input area for entering proxy setting such as address, port, proxy username and password. |
*The availability of features listed above may be service provider dependent. If a feature is not available, please check with your service provider for further details and availability.
Press the [Option] button to access the [Language], [Backup Server] and [Proxy setting] settings.
Configure the backup server information by entering the server hostname (e.g. cluster.offsitestorageserver.com) or IP address (e.g. 192.168.1.1) of the backup server in the [Backup Server] field.
For backup server that accepts connection on custom port only, append the hostname or IP address in the [Backup Server] field, by adding a semi-colon (:) and the custom port number at the end.
Example:
backup.server.com:8080 / 192.168.1.1:8443
For security concerns, you can configure the backup client application to communicate with the backup server in SSL protocol (Secure Socket Layer), select [https] from the dropdown menu at the [Backup Server] section.
Enter your login credentials in the [Login Name] and [Password] fields.
If you do not remember your password, press the [Forgot your password?] button to retrieve a forgotten password email.
Please do not attempt to login with an incorrect password, as a backup user account will be locked after 3 bad password attempts. Backup job cannot be run for backup user account with status as locked.
Please contact your service provider to unlock your account if it is locked.
Configure which language to start the backup application in by select the language of your choice under the [Language] drop down menu. For the list of supported languages, please refer to Appendix A.
To enable [Proxy setting], select the [Use proxy to access the backup server] checkbox button, and enter the corresponding proxy information. For [Sock] proxy, both v4 and v5 without user authentication are supported.
Press [OK] to login when all configurations are entered.
For initial login of existing backup user on new computer, you will be prompted for the encrypting key of all existing backup set.
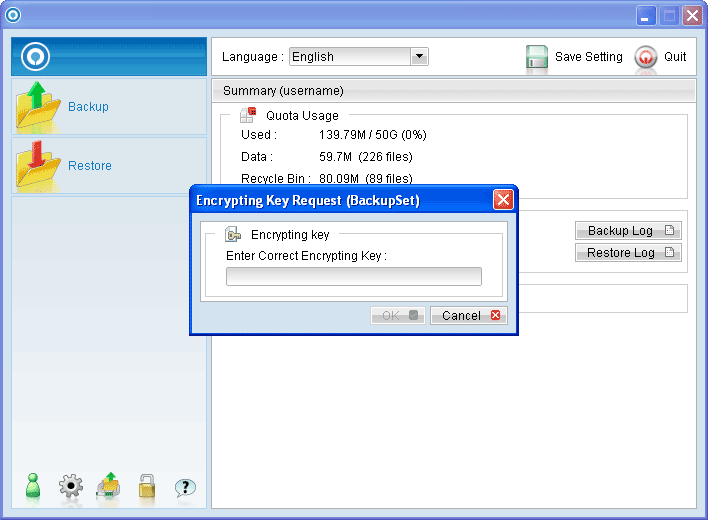
Menu Item |
Description |
Enter Correct Encrypting Key |
Input box for entering encrypting key of existing backup set. |
OK |
Click to confirm on encrypting key. |
Cancel |
Click to proceed without using encrypting key. |
Enter the correct encrypting key and click [OK] to proceed. Alternatively, if the encrypting key is lost, press [Cancel] to proceed without encryption (e.g. for all backup job performed afterward). This would allow data backed up in the future to be restore-able (as they are no longer encrypted), but existing data that are already encrypted by the lost encrypting key would not be restore-able.
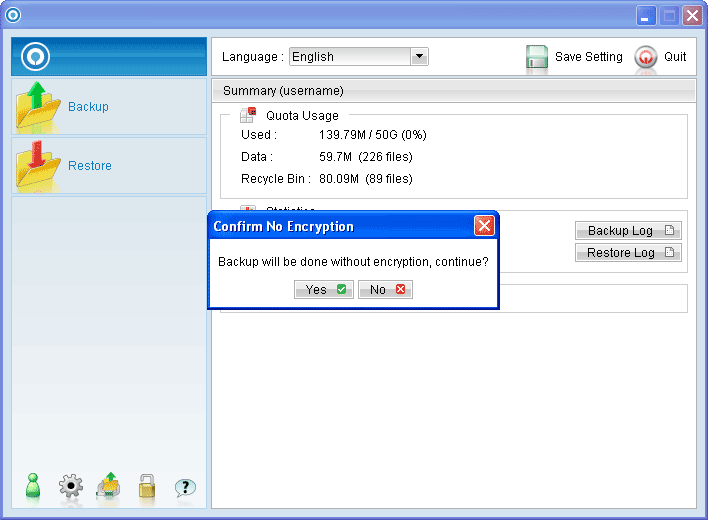
In case of encrypting key lost, it is strongly recommended that a new backup set be created, to ensure that data backed up in the future is encrypted and restore-able.